If you have a business or service where you want to allow clients and customers to book appointments with you, take a look at the Appointment Schedules feature in Google Calendar.
Different than Google Calendar Appointments Slots, Appointment Schedules let you create and share pages for booking appointments. You can meet in person, via phone call, or using Google Meet. In addition, both you and your clients receive email notifications as confirmations and reminders.
Appointment Schedules in Google Calendar have many settings. So, let’s check out the basics of the feature so that you can start using it!
Índice
Appointment Schedules Availability
Like many other Google Calendar features, Appointment Schedules are limited to certain types of accounts and certain platforms. Please check the following if you’re interested in using Appointment Schedules.
- Individuals can use the feature if subscribed to Google Workspace Individual.
- Business Starter accounts do not have access to the feature.
- Those who have a Google Calendar account for work or school can use either Appointment Schedules or Appointment Slots.
- You can currently only set up Appointment Schedules in Google Calendar on the web.
Enable Appointment Schedules
If you normally see Appointment Slots when creating an event in Google Calendar, you can turn on the Appointment Schedules feature in its place.
RELATED: How to Use Appointment Slots in Google Calendar
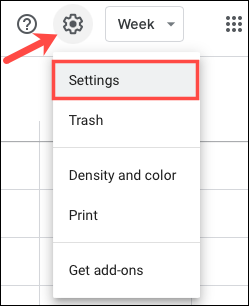
Head to Google Calendar and sign in. Click the gear icon at the top and choose “Settings.”
In the navigation on the left, pick “Appointment Schedules.” Then, check the box for Create Appointment Schedules Instead of Appointment Slots.
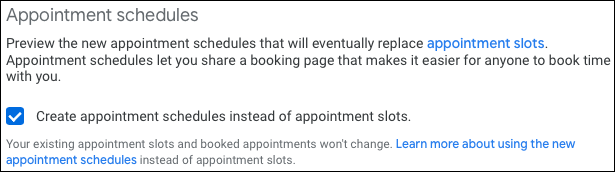
You can uncheck this box at any time to use Appointments Slots again.
Set Up an Appointment Schedule
Now you can get started setting up an Appointment Schedule one of two ways.
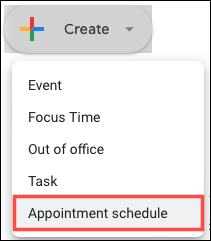
Click “Create” on the top left and pick “Appointment Schedule.”
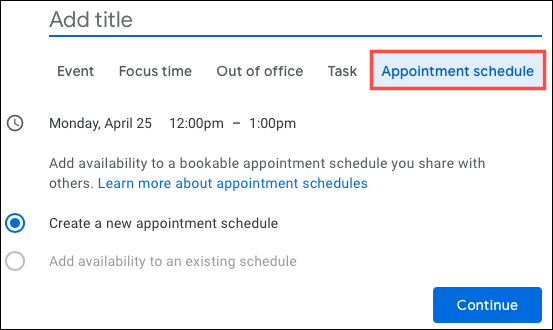
Alternatively, click a date and time on your Google Calendar and choose the Appointment Schedule tab. Mark the option for Create a New Appointment Schedule, add a title, and click “Continue.”
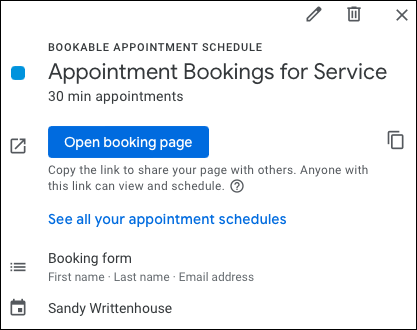
You’ll then see the Bookable Appointment Schedule sidebar appear on the left. This is where you’ll configure each of the settings for your bookings.
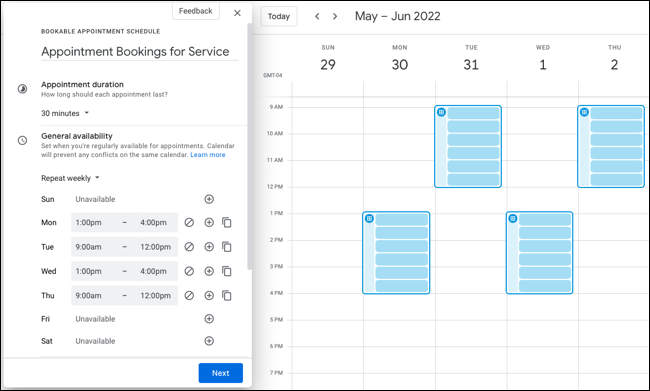
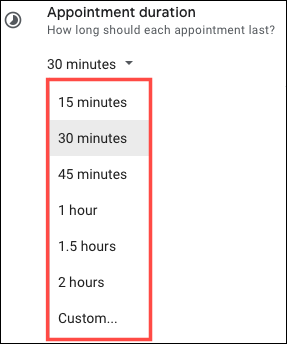
Appointment Duration
Appointments must be at least 30 minutes long. Use the drop-down box to choose how long you want each appointment to be. Use the Custom option for a specific time period.
General Availability
You have complete flexibility for your Appointment Schedule. You’ll see the days of the week listed where you can select a timeframe for each day or only specific days. To add a day, click the plus sign and to remove one, click the circle with the line through it. To save time, you can set up one day and copy the timeframe to the other days, using the copy icon.
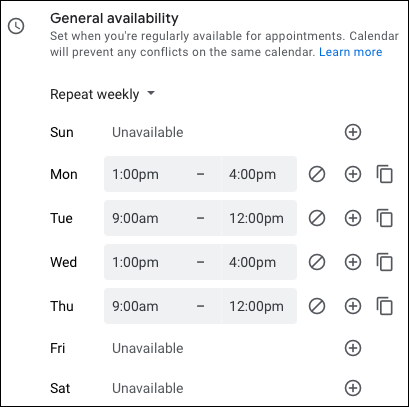
Additionally, you can have your Appointment Schedule repeat every week if you like. Click the drop-down box at the top of the section and pick “Repeat Weekly.”
RELATED: How to Add, Edit, or Delete Recurring Events in Google Calendar
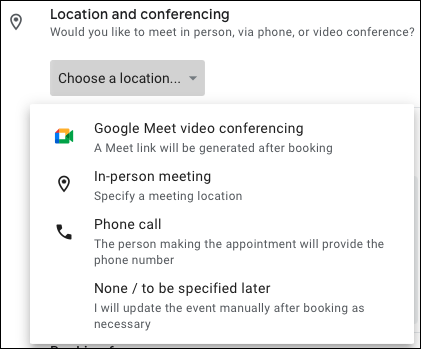
Location and Conferencing
Choose the location for your appointments. You can pick Google Meet Video Conferencing, In-Person Meeting, or a Phone Call. You also have the option to choose None if you want to specify the location later.
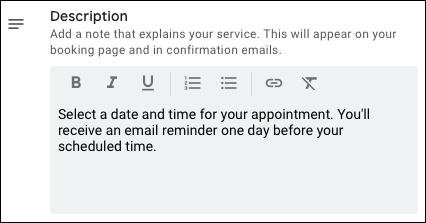
Description
You can optionally add a description that appears on your booking page and in the email confirmations to your clients or customers. You might include an explanation of your service, mention the reminder email someone receives, or include a note about your privacy policy.
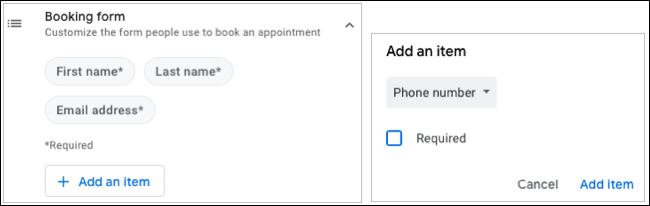
Booking Form
The booking form for your appointments requires the person’s first and last name along with their email address. If you’d like to add another field, such as phone number, expand this section and click “Add an Item.”
Select Phone Number or Custom Item, optionally make the field required, and click “Add Item.”
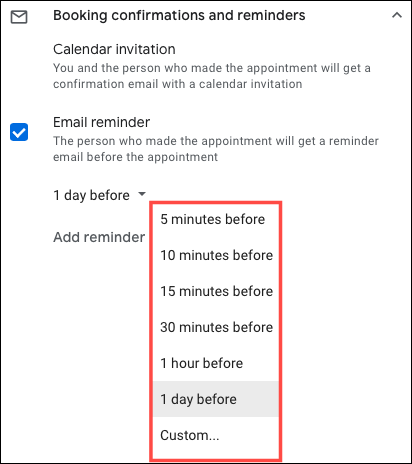
Email Reminder
One more feature you’ll want to check out is for email reminders, so expand that section. You’ll see that both you and the person scheduling the appointment receive a confirmation email with the Google Calendar invitation.
RELATED: How to Disable Email Reminder Nudges in Gmail
If you like, you can check the box to send an Email Reminder to your client or customer. This is great for reminding them about the appointment a day or an hour ahead of time. You can also choose a specific timeframe selecting “Custom” in the drop-down box and include more than one by clicking “Add Reminder.”
Save Your Appointment Schedule
When you finish setting up your schedule, click “Save” at the bottom. You’ll then see a new pop-up window for you to visit or copy a link to your booking page or see your appointment schedules if you set up more than one.
This is the same window you’ll see if you select the booking event on your calendar.
If you have a business where bookings are essential or a classroom where student appointments would be helpful, be sure to take a look at the Appointment Schedules in Google Calendar.